
Zoom Meetings
To access Zoom, go to https://jccc.zoom.us Click on Host a meeting and choose Schedule Meeting. You will then be prompted to login with your JCCC single sign-on credentials.
Zoom offers multiple methods to schedule a meeting. A host has control over the options for their scheduled meetings except for settings that an administrator has locked for all users in the account or for all members of a specific group.
- Schedule from the Zoom desktop client or mobile app
- Schedule from the Zoom Web Portal
- Schedule from plugin (Chrome, Outlook, Firefox)
- Click on the Schedule icon/link.
This will open the scheduler window. - Select your meeting settings.
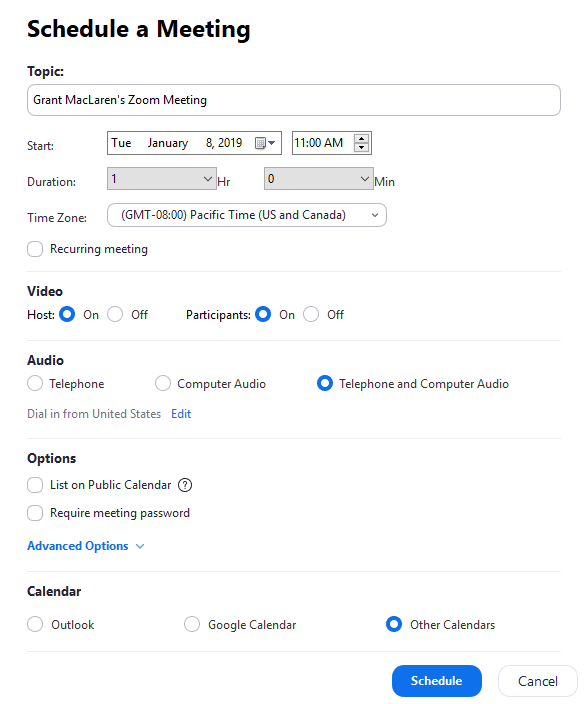
- Topic:Choose a topic/name for your meeting.
- Start: Select a date and time for your meeting. You can start your meeting at any time before the scheduled time.
- Duration: Choose the approximate duration of the meeting. Note that this is only for scheduling purposes. The meeting will not end after this length of time.
- Time Zone: By default, zoom will use your computer’s time zone. Click on the drop down to select a different time zone.
- Recurring meeting: Choose if you would like a recurring meeting, i.e. the meeting ID will remain the same for each session.
- Host Video: Choose if you would like the host video on or off when joining the meeting. Even if you choose off, the host will have the option to start their video.
- Participant Video: Choose if you would like the participants’ videos on or off when joining the meeting. Even if you choose off, the participants will have the option to start their video.
- Audio Options: choose whether to allow users to call in via Telephone Only , VOIP Only (computer audio), both, or 3rd Party Audio (if enabled for your account).
- List on Public Calendar: Post the meeting on the public meeting/webinar list so that anyone can view it. We recommend you add a meeting password to secure your meeting.
- Require Meeting Password: You can select and input your meeting password here. Joining participants will be required to input this before joining your scheduled meeting.
- Advanced Options: Click on the arrow to view additional meeting options.
- Enable join before host: Allow participants to join the meeting without you or before you join. The meeting will end after 40-minutes for Basic (free) users if 3 or more people join the meeting.
- Mute Participants Upon Entry: If join before host is not enabled, this will mute all participants as they join the meeting.
- Use Personal Meeting ID:Check this if you want to use your Personal Meeting ID. If not selected, a random unique meeting ID will be generated.
- Record the meeting automatically: Check this if you want the meeting to be automatically recorded. Select if you want it to be recorded locally (to your computer) or to the cloud (us/recording).
- Schedule For: If you have scheduling privilege for another user, you will be able to choose who you want to schedule for from the drop down.
- Alternative Hosts: Enter the email address of another Zoom user with a Pro license on your account to allow them to start the meeting in your absence. Read more about Alternative Host.
- Calendar: Add to any selected calendar and send out invites to participants.
- Click Schedule to finish and open the calendar you have selected.
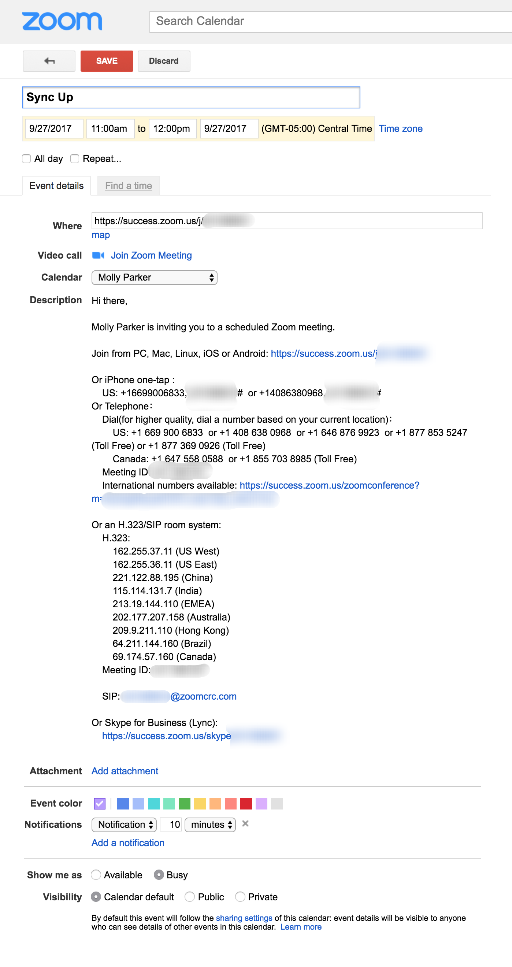
Note: Choosing Other Calendars will allow you to copy and paste the scheduled meeting information such as date, time, and meeting URL into an email that you may send to invitees.
Add to calendar
After you are done setting up your Scheduled meeting, Click the Schedule icon at the lower right-hand side of the window.
As Host
- Scheduling Zoom Meetings
- Inviting Others to Join a Meeting
- Host Controls in a Meeting
- Sharing Your Screen
- Managing Participants in a Meeting
- Getting Started with Breakout Rooms
- Managing Breakout Rooms
- Muting Participants as Host.pdf
- Ways to Protect Zoom Meetings
As Participant
For more information and tips, check out these articles from Zoom:
- Best Practices for Securing Your Virtual Classroom
- How to Keep Uninvited Guest Out of Your Zoom Event
Important Notice:
The privacy and security of our customers is our top priority. Based on feedback from our Education community, as of March 26th, the screen sharing settings within your account have automatically defaulted to “Only Host.”
Next to the share screen tab at the bottom of the screen you need to click Multiple users can share screens at the start of each meeting