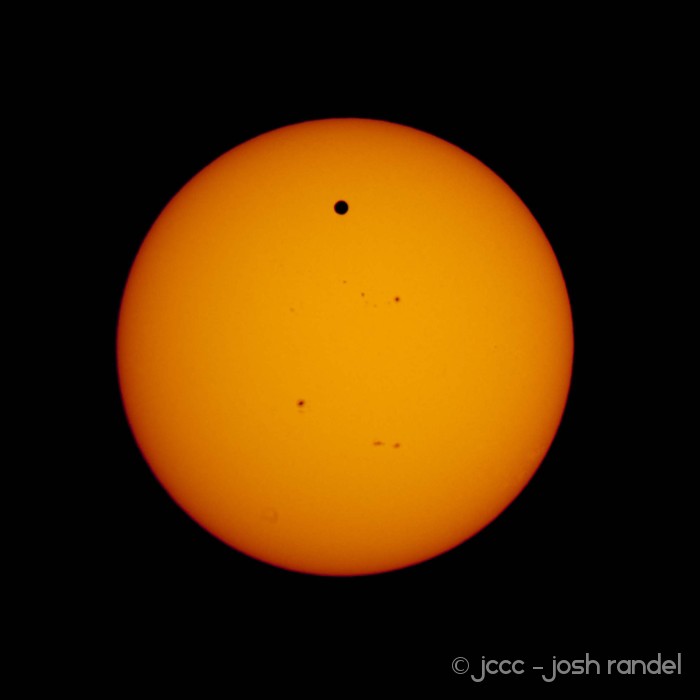
Venus making its way across the face of the Sun imaged by former JCCC Astronomy student Josh Randel using his Nikon D80 and one of our 8" Celestron SCTs using a mirrored glass solar filter.Our public open house for the Transit of Venus was surprising for a few different reasons. First, we had clear skies! Usually, when we plan a public observing events, that’s the signal for clouds to rush in from all directions and hover over the Paul Tebbe Observatory. Our second surprise after having clear skies was to have hundreds of people lined up to take a look at the Sun and Venus! Normally, we have a 50 or so people turn out for one of our events. For this past Spring’s Evening With The Stars program, we were elated to have 150 people come out. This past Tuesday, we EASILY had double that number if not more! People from the college and the community lined up down the stairwell from the roof and all the way down the hall on the 4th floor of the CLB, and all evening long, the line never shrank!
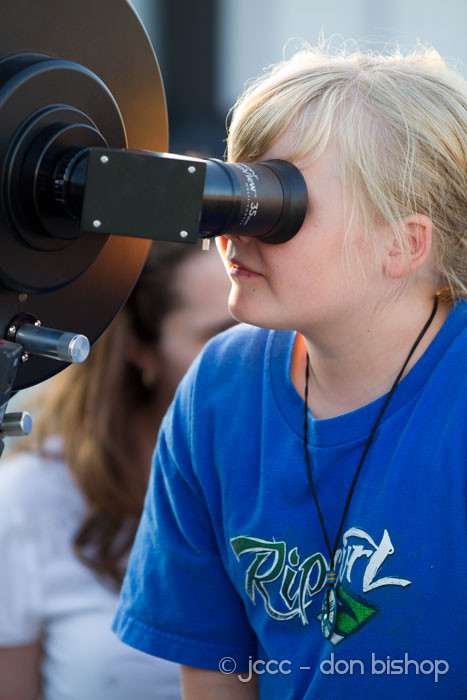
A youngster taking a rare look at Venus and the Sun through our 12" Meade SCT. --Photo by Don BishopWe apologize to those who weren’t able to make it to the roof before sunset, but for those who did, we got to see a fantastic and rare sight, Venus eclipsing the Sun! Venus is nearly as large as the Earth, and nearly four times the size of our Moon, but since it’s much further away from us, it’s angular size in the sky is much smaller than the Moon’s so when Venus passed directly between us and the Sun, it didn’t block the entire disc of the Sun, but only a part of it. Since Venus doesn’t orbit in precisely the same plane around the Sun as the Earth, it’s very rare that Venus ever passes directly between us and the Sun. Usually, Venus misses the Sun by a degree or two, but when the geometry is just right, we’re treated to a transit event like we were able to witness last Tuesday evening.
The dark disc of Venus passing across the face of the Sun wasn’t the only thing that visitors were able to see when they came to the Paul Tebbe Observatory. With the two different types of filters we were using to observe the Sun, we were able to see a number of sunspots, and some solar prominences, hydrogen and helium gas caught up in large magnetic arcs above the solar surface. After sunset, many stayed around and were able to see Mars and Saturn through the telescopes as well as the double-star Alberio.
All in all, it was a fantastic evening and we were overwhelmed and humbled by the magnitude of the turnout. We would like to thank everyone who came out to join us and look forward to our next observing event! To see more photos from the event, check out our page on Facebook.
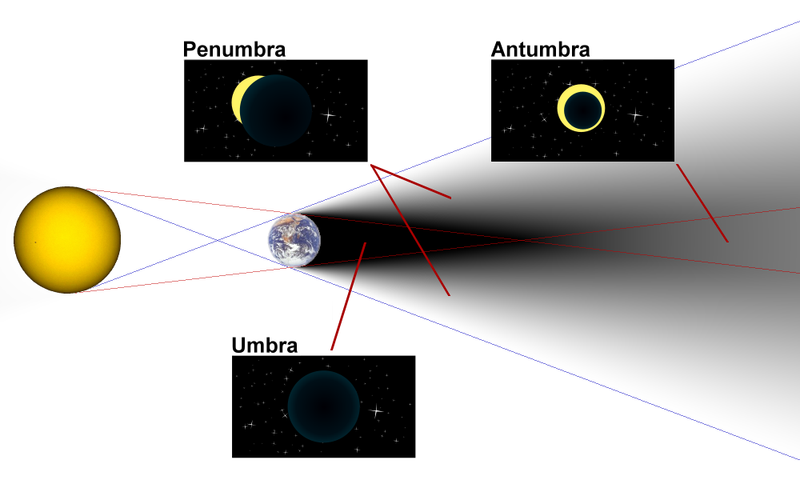
This morning we got to experience a lunar eclipse! Unfortunately, the eclipse began as the Moon was setting, so we didn’t get to see the entire eclipse, just the beginning.Anatomy of the Earth's shadow The penumbral eclipse began at around 5:30am this morning. During a penumbral eclipse, the Moon is in the penumbral shadow of the Earth, and from the vantage point of the Moon, you would have seen a partial solar eclipse as the Earth partially blocks the Sun’s light from reaching the Moon. At 6:45am, the Moon began to enter the Earth’s umbral shadow and we began to see a partial lunar eclipse. From the Moon looking sunward, if you’re in the Earth’s umbral shadow, the Sun would be completely blocked. You’d see a total solar eclipse! The total lunar eclipse began at 8:04am, but by then, the Moon had completely set. You would have needed to be further west to see the total eclipse, and all the way over in Japan to see the full duration of the eclipse. Next opportunity for us isn’t until 2014, but that eclipse we’ll be able to see fully.
The corn is starting to dry out, so it must be time for the Fall semester to start up again. Here at JCCC, though, the work doesn’t stop just because its Summertime. This past summer term, I had an honors student that worked on astrophotography and differential photometry. Both were fun projects, and I’ll write more about the variable star photometry later. For now, let me show off some of the excellent images G. W. Francis took with our SBIG ST-8 CCD camera and his own Nikon D40.
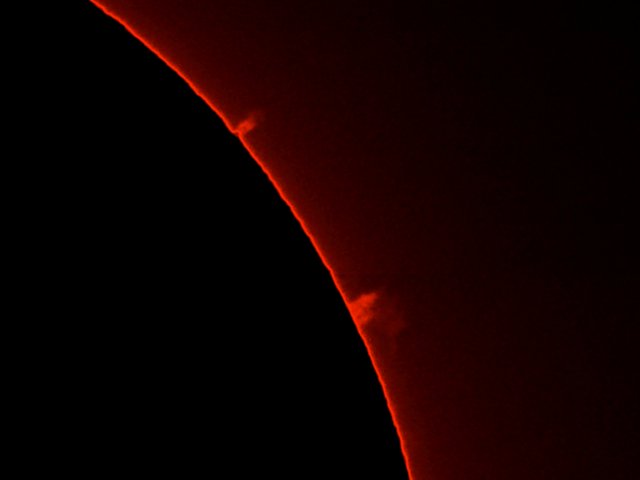
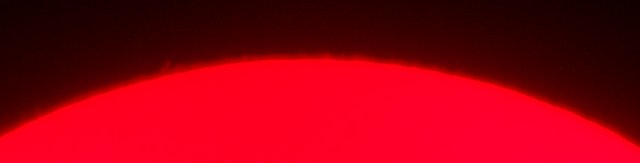
A solar prominance seen throuh a Hydrogen-alpha (H-a) filter. The solar disc has been masked to enhance the prominance.
Every Monday evening in June, it seemed, was cloudy, so we decided to take advantage of a sunny afternoon and image the Sun using an H-alpha filter. This filter only allows the one wavelength of red light emitted by hydrogen atoms which enables us to see features like the prominence shown above.
Ursa Major obscured by the reflected light from sodium vapor lamps.
GW mounted his D40 onto the piggyback mount of our Celestron 8″ SC telescope and tried to take an image of the constellation Ursa Major. Most of what he got was the reflected light from the sodium vapor lamps in the parking lot. This was the last night of observing at the college. The light pollution was just too much for us.
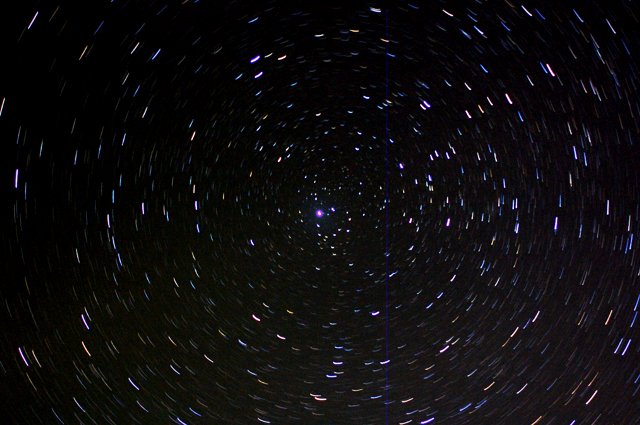
21 30-sec exposures from the D40 rotated and stacked to form a single image of the Northern Sky. Polaris is the bright star in the center of the image. 21 30-sec images from the D40 stacked, but not aligned so that the rotation of the Earth is evident by the trails formed by the stars.
GW mounted his Nikon D40 on a tripod and pointed it northward, centering Polaris in the field of view and collected 21 images each with a 30-sec exposure. By rotating and aligning each image, a detailed view of the Northern Night Sky is revealed. When the images are not rotated, but simply stacked and merged together, the rotation of the Earth becomes apparent as the stars leave trails through the sky. Notice that Polaris, which is very close to the North Celestial Pole, remains nearly fixed in place.
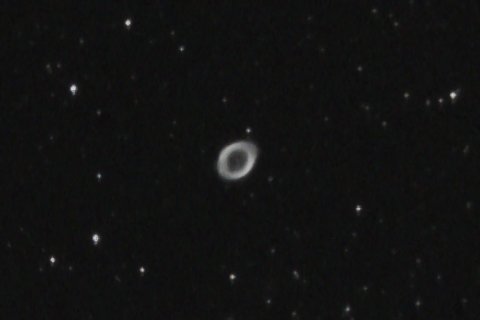
M57 - The Ring Nebula
Before settling down onto the program variable star for the evening, the we targeted several Messier objects. M57, the Ring Nebula, is a planetary nebula. A star, not unlike our Sun, threw off its outer layers as it died leaving behind an expanding shell of gas and a small but staggeringly hot white dwarf in the center.
M16 - The Eagle Nebula imaged by peeking through the gaps in a maple tree. M16, The Eagle Nebula, made famous by the Hubble Telescope’s image Pillars of Creation, had to be imaged by peeking through the gaps in a maple tree near where we had setup the telescope. The location was chosen for optimum viewing of the variable star DY Her, not M16, but we got lucky. In the image you can make out the famous pillars in the top center of the image.
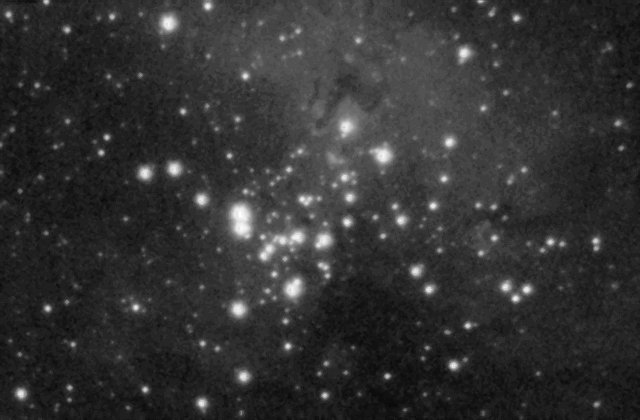
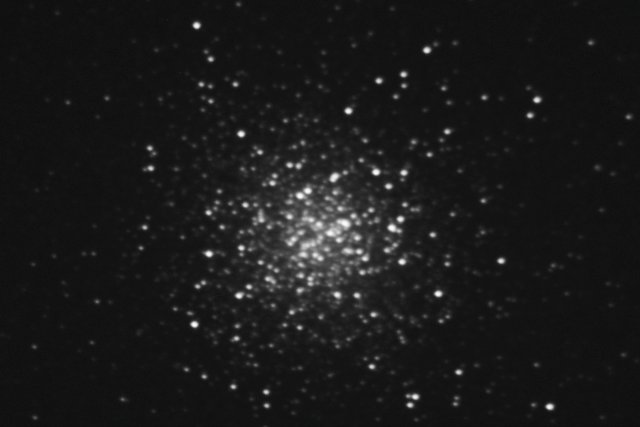
M13 - The Great Cluster in Hercules M13, the Great Cluster in Hercules, is one of the closest (relatively speaking) globular clusters to our planet. This dense cluster is home for around a million ancient stars.
Rather than using the SBIG ST-8 CCD camera, I opted for my Nikon D90 for these photos. In some respects its better, in other ways not so much. First stop: The Sun.
The chromosphere shown in H-alpha
In this image, you can see the Sun’s chromosphere and a small prominence on the left side of the image. The camera doesn’t have the resolution nor dynamic range of your eyeball, so cool though this may be, nothing substitutes for seeing the Sun live. This image was taken through a DayStar H-alpha filter threaded to the back of our 12″ Meade on the roof of the CLB with my D90. I’ve tried doing solar imaging with the SBIG camera, but even at the fastest shutter speed, the image saturates. Even in the above image, the disc of the Sun is overexposed in order to make the chromosphere visible.
The double star Alberio in the constellation of Cygnus.
Alberio is a nice double star in the constellation of Cygnus. If you have a pair of binoculars, this is an easy target. The color difference between the two stars is due to their different temperatures. The bright blue star is extremely hot where as the yellow star is cooler (relatively speaking) with a temperature closer to that of our own Sun. This image is a single 30″ exposure with the D90 set at ISO3200. The noise isn’t too bad, but being a single shot, there’s more noise and less detail than one could get by taking multiple images and combining them. I’ll try that some time soon. With the D90 as opposed to the SBIG, the colors of the two stars are really easy to capture. With the SBIG, one would have to take three separate images through a red, a green, and a blue filter and combine them to form the color image. Doable, but definitely more work.
The Great Cluster in Hercules, M13
This image of the Great Cluster of Hercules, M13, is a single 30″ exposure like the image of Alberio, but with the much dimmer object comes a lower signal-to-noise ratio. Imaging objects like this is where the SBIG becomes vastly superior to a digital SLR like the D90. As with the Alberio image, this image could be improved by combining multiple exposures.
Here is a mosaic of the first quarter moon taken this last Wednesday, March 5th. The individual images were collected with a Nikon D90 threaded to the Meade 12″ SCT. The separate images were then assembled using GIMP, an open-source image manipulation program.
The first quarter moon shown in its correct orientation
Here are two mosaics of the Sun stitched together with images collected on Wednesday afternoon. These images were taken with a Nikon D90 through a 12″ Meade SCT fitted with an H-alpha filter. The first mosaic is of the full disc of the Sun. There are some details, but the glare of the photosphere, even through the very narrow passband of an H-alpha filter, limits what can be seen in the chromosphere and corona. In the second image, the transfer curve for image was manipulated to eliminate the photosphere and highlight the chromosphere and corona. Notice on the lower right portion of the limb, there is one small, bright, prominence, and several faint and larger prominences. (since the image is inverted, this would be the north-eastern side of the limb.
Full disc mosaic of the Sun in H-alpha emission.Full-disc image of the chromosphere and lower corona in H-alpha.
Ok, it’s not the greatest picture, but we still are dealing with the wind shaking the telescope. You can see a couple of sunspots from, though. These are spots associated with the new solar cycle, #24. Note their latitude. Sunspots early in a solar cycle will form at high latitudes at first. Later in the cycle, these spots will appear at lower and lower latitudes as the Sun’s magnetic field gets more and more twisted. More Sun pics are coming, but it will take me a while to work through the processing. Sunspots from Solar Cycle 24 Faint prominences hovering above the chromosphere.
First of all, the photos below were not taken by me, but by my honors student this semester. So far, the images have been pretty good, given the level of light pollution here in the middle of town. All of these images were aquired using our 12″ Meade SCT and an SBIG ST-8XME Camera and an SBIG CFW-8 filter wheel. The first is a color image of Jupiter. The red filter we have is a bit too broad and has a higher transmittance than the green and blue filter.
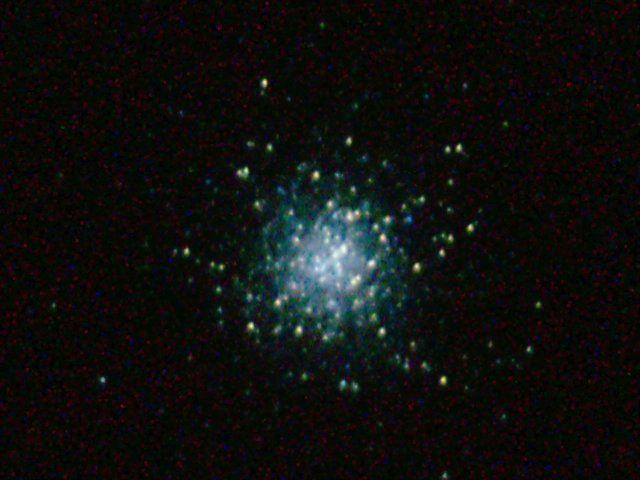
The next image is of the Great Cluster in Hercules, M13. This image is the combination of multiple short exposures co-added to yield a single, more detailed image.
This last image is a mosaic of five images to create a single image of the 1st Quarter Moon. …ok, slightly past 1st Quarter. The image was taken using our blue filter.